
1. Arduino Uno
2. Linux PC/Windows PC (Tested with Windows 10, Ubuntu 14.04 LTS)
3. USB cable A to B
4. Breadboard
5. 5 mm LED
6. 220 Ohms Resistor (colour code – Red, Red, Brown)
7. Potentiometer – 10K Ohm
8. Light Dependent Resistor (LDR)
9. Jumper Wires
Way to go ->
1. Connect Arduino Uno to PC via the USB cable.
2. Write the following sketches in the Arduino IDE, and upload them one by one.
LEDFade.ino
// These constants won't change. They're used to give names
// to the pins used:
const int analogInPin = A0; // Analog input pin that the potentiometer is attached to
const int analogOutPin = 9; // Analog output pin that the LED is attached to
int sensorValue = 0; // value read from the pot
int outputValue = 0; // value output to the PWM (analog out)
void setup() {
// initialize serial communications at 9600 bps:
Serial.begin(9600);
}
void loop() {
// read the analog in value:
sensorValue = analogRead(analogInPin);
// map it to the range of the analog out:
outputValue = map(sensorValue, 0, 1023, 0, 255);
// change the analog out value:
analogWrite(analogOutPin, outputValue);
// print the results to the serial monitor:
Serial.print("sensor = ");
Serial.print(sensorValue);
Serial.print("\t output = ");
Serial.println(outputValue);
// wait 2 milliseconds before the next loop
// for the analog-to-digital converter to settle
// after the last reading: delay(2);
}
 LDRBlink.ino
int sensorPin = A0; // select the input pin for the potentiometer
int ledPin = 13; // select the pin for the LED
int sensorValue = 0; // variable to store the value coming from the sensor
void setup() {
// declare the ledPin as an OUTPUT:
pinMode(ledPin, OUTPUT);
}
void loop() {
// read the value from the sensor:
sensorValue = analogRead(sensorPin);
// turn the ledPin on
digitalWrite(ledPin, HIGH);
// stop the program for <sensorValue> milliseconds:
delay(sensorValue);
// turn the ledPin off:
digitalWrite(ledPin, LOW);
// stop the program for for <sensorValue> milliseconds:
delay(sensorValue);
}
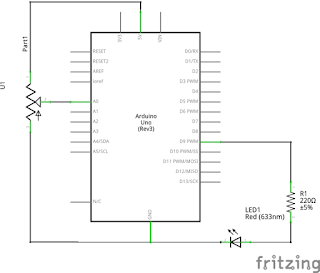
Hardware Connections ->
1. LED and Potentiometer to Arduino Uno


2. LED and LDR to Arduino Uno


No comments:
Post a Comment